How to Make an Audio-Reactive Micro-Tracker Reel for Any Song
Build a branded audio-reactive Reel for any licensed song: map real sound to note steps and a glowing micro-tracker, then export with your own logo. Includes ChatGPT Go and Plus/Pro prompts.
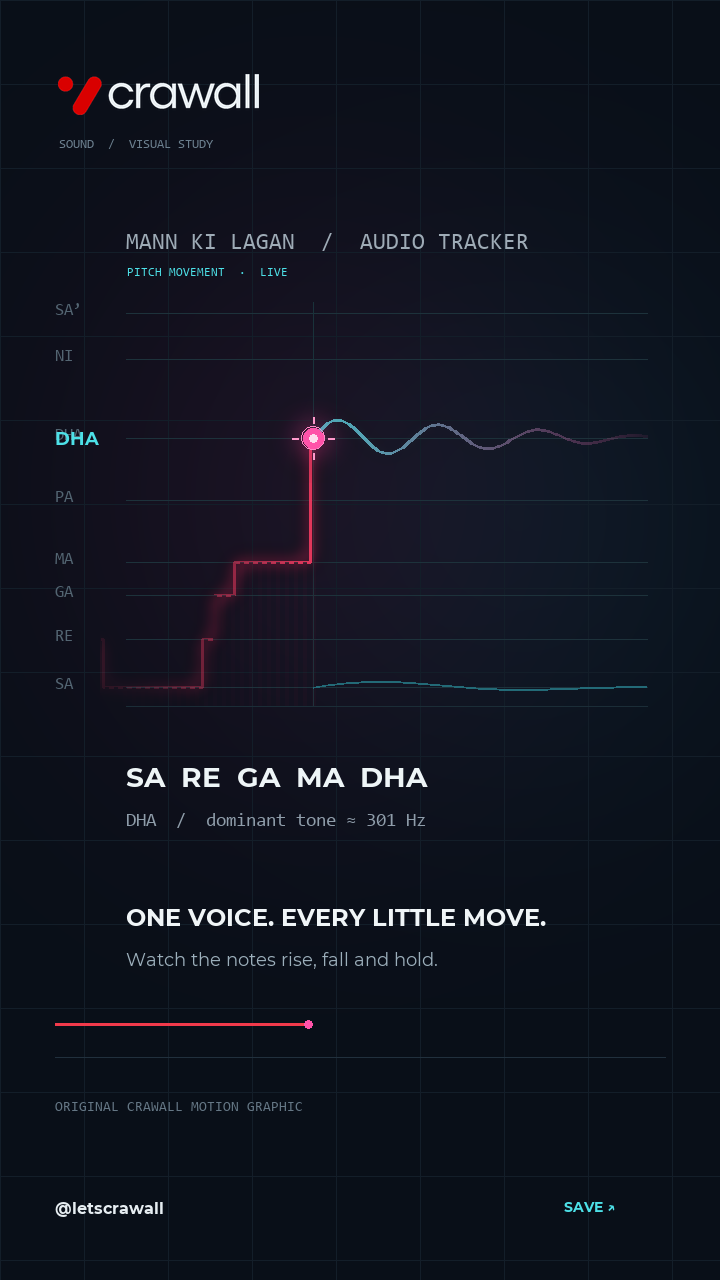
Turn a song into a moving visual story. This guide shows how to create an original, branded 9:16 Instagram Reel in which a glowing playhead follows notes, a thin frequency wave reacts to the music, and a coloured trail fades behind the motion. You can use your own logo, palette and call to action. The workflow works with any soundtrack you own or are licensed to use.
The idea
Most music visualisers only make a bar bounce. Here, three measurements tell a clearer story: loudness controls the pulse, frequency bands shape the waveform and colour, and a smoothed pitch estimate selects the note row. A fixed micro-reticle gives the eye one place to follow while the staircase trace moves past it. An older trace remains visible as a softly blurred, fading background.
What you need
- A song or instrumental that you have permission to use on Instagram and in the final video. Owning an MP4 is not the same as holding music rights.
- Your own transparent PNG or SVG logo, brand colours, handle and final CTA.
- A local computer with Python, NumPy, Pillow and FFmpeg. A reference clip is optional; analyse it for timing and layout, but draw every final frame yourself.
- ChatGPT Go or Plus/Pro with Codex desktop for guided local implementation. A browser chat cannot read a Windows path without an upload.
Step 1 — Set up the project
Create inputs/ and outputs/ folders. Put the soundtrack in inputs/audio.mp4 (or audio.wav), your logo in inputs/brand-logo.png, and an optional visual reference in inputs/reference.mp4. Pick a 1080 × 1920 canvas, 30 fps and a duration that fits the actual audio. Reserve the top and bottom safe areas for Instagram UI.
Step 2 — Measure the real audio
Decode audio to mono samples. For each video frame, compute a short-window RMS value for loudness. Calculate a short-time spectrum with an FFT for low, mid and high frequency energy. Track a plausible lead pitch across adjacent frames with temporal smoothing; a single tallest FFT peak often jumps between harmonics. Quantise the stable estimate into note rows. If the song is polyphonic, label the row as a visual estimate rather than an exact transcription.
Step 3 — Design the motion
- Place a fixed glowing playhead at about 44% of the frame width. Draw tiny reticle ticks around it.
- Draw a thin staircase line from the estimated note sequence and scroll it left. Highlight the newest step; fade older steps gradually.
- Render a soft, separately blurred glow beneath the sharp trace. Let the coloured residual track tint the background as it fades.
- Draw a short cyan and pink waveform ahead of the playhead. Tie height to the waveform envelope, and colour to the measured frequency bands.
- Keep note labels readable: SA, RE, GA, MA, PA, DHA, NI, SA′, or use the scale that fits your music. Do not claim that decorative rows are a musicological transcription.
- Show your real logo in the upper safe area. Use your brand name, colours and handle in the end frame; never imitate another creator’s watermark.
Step 4 — Storyboard the Reel
Opening: “What does this melody look like?” Introduce the moving tracker immediately. Middle: let note transitions, tiny frequency movements and the fading path carry the visual. End: “YOU CAN MAKE THIS” plus “Map audio → Track notes → Animate” and your own handle. Keep text short enough to read on a phone.
Copy-paste prompt for ChatGPT Go
You are a motion designer and Python/FFmpeg engineer. In my local project folder, create one ORIGINAL branded 9:16 Instagram Reel from inputs/audio.mp4, inputs/brand-logo.png and optional inputs/reference.mp4. Brand: [YOUR BRAND]. Colours: [PRIMARY HEX], [ACCENT HEX], [BACKGROUND HEX]. Handle: @[YOUR HANDLE]. CTA: [YOUR CTA].

Use the actual licensed soundtrack. At 1080x1920 and 30 fps, draw a fixed glowing micro-playhead, tiny reticle marks, a note-by-note stepped trace scrolling underneath it, a waveform ahead of it, and an age-based coloured trail with soft blur fading into a tinted background. Derive the pulse, wave and approximate notes from real RMS, frequency-band and smoothed pitch measurements. If reference-tracker detection works, use only its timing/coordinates; do not copy reference pixels, logo or watermark. Put my actual transparent logo in the upper safe area.

Export outputs/branded-microtracker.mp4, cover.png, three preview frames, editable source script and README. Preserve the soundtrack; stream-copy AAC if possible. Check resolution, fps, audio duration, safe margins, logo sharpness and audio hash when stream copy is possible. If rendering is unavailable, provide a complete runnable local script and commands, and do not claim an MP4 was made. Do not upload or publish anything.
Copy-paste prompt for ChatGPT Plus or Pro
Act as a senior motion designer, audio-visualisation engineer and video QA editor. Build a premium, original micro-tracker Reel entirely in my local project folder. Inputs: inputs/audio.mp4 (licensed soundtrack), inputs/brand-logo.png, optional inputs/reference.mp4. Brand: [YOUR BRAND]; primary, accent and background colours: [HEX, HEX, HEX]; handle: @[YOUR HANDLE]; final CTA: [YOUR CTA].

First inspect audio duration, format and representative reference frames. Write a brief storyboard. Analyse audio frame by frame for RMS, frequency-band energy and a continuity-aware lead-pitch estimate. If you can detect the reference tracker, use its coordinates solely as motion measurements and interpolate gaps; otherwise derive movement from the song and label it as approximate. Draw all graphics from scratch: a fixed precise micro-reticle, thin note staircase that scrolls underneath, luminous wave ahead, cyan/magenta highlights, layered glow and a long, gradually fading coloured track that subtly colours the background. The tracker must move on actual note changes and pulse with measured loudness.

Use my real logo in the upper safe area, readable typography and an opening hook. Finish with 'YOU CAN MAKE THIS', a three-step summary and my handle. Never reuse reference frames, watermark or third-party branding. Render opening, peak and ending previews and inspect them before final export. Then export 1080x1920 H.264 MP4 at 30 fps with the original audio, a cover PNG, editable source and a QA report. Verify fps, dimensions, duration, audio and safe margins with FFprobe. Compare input and output audio-stream hashes if stream-copying. Fix any failed check. Do not upload, publish or ask for credentials.
Step 5 — Render and check
Render a few still frames first: opening, peak movement and CTA. Look for a crisp logo, visible but restrained glow, an exact playhead, a trail that fades rather than cuts off, and no text under Instagram controls. Export H.264 video and AAC audio. Use FFprobe to check dimensions, 30 fps and duration. If the input soundtrack was already AAC and copied without re-encoding, compare stream hashes; otherwise listen to the final MP4 and confirm timing manually.
Brand replacement checklist
- Replace every example brand name, handle, logo and URL with your own.
- Supply a transparent high-resolution logo rather than asking the model to redraw it from memory.
- Use two to three brand colours and one clear CTA; the tracking motion should remain the hero.
- Use only music, footage and identity marks you can publish.
Privacy note: Putting media into an online chat uploads it to that service. If you need a device-only workflow, run the rendering script locally and keep your media out of browser uploads. Codex desktop can work with local files, but its task context may still be processed online.